Tuesday, October 28, 2008

What are the Type of Nails to Use When Stretching Your Own Canvas?

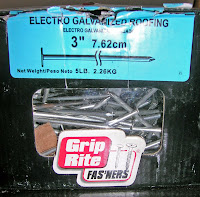
When I am stretching my own canvases, the right nails makes the job so much easier and makes the canvas look more professional. When you walk into the hardware store and see this in front of you, I bet you think "Holy Smokes! Which do I choose? Well, here are a few quick tips for you, when picking out the best nails for stretching your own canvas.


Picking out your nails & staples


The second step in How to Stretch Your own Canvas is the choice of the nails you plan to use for the frame, braces, and stretching the canvas to the frame. Depending on the size of the wood you pick for the frame, the nails will vary. The wider you go the longer the nails need to be. The same goes for the braces. The canvas however, uses completely different nails. Usually I find that a staple gun and staples work best.

1) For the Frame: Frame nails need a larger head which is easier to hit when hammering the wood together. A good size that works well for me is 3 inch Electro Galvanized Roofing nails and they come in various lengths depending on the wood size you are using. Try different nails and sizes and see what works best for your canvas.


2) For the Brace: Brace nails are usually a little smaller with a smaller head as they have a smaller area to go through. The best nail I have found for this is the 3 inch Bright Finish nails. These also come in different lengths depending on your wood. Once more, experiment with different nails and see what works best for you and your canvas.


3) For the Canvas: When attaching the canvas to the frame, depending on the look you want to achieve, there are various nails and staples that work great. You can use a staple gun that uses either industrial staples or nails or small nails. For me, I have found that the use of a staple gun and staples works best and can hold the canvas much tighter than staple gun nails or traditional nails, as well as, easier to work with. The best rule of thumb though is to see what works and feels best for you.


Now that you have your wood and nails chosen, the next step it choosing the canvas you like best. That's coming up next! Until then...Enjoy the Process!

Want to see more about this topic? click here


Tuesday, October 21, 2008

What's up with me, you ask? How did I learn to stretch canvas?

I was talking with my friend the other day and she asked some questions regarding the blog and how I learned to stretch my own canvases and why I decided to start doing it. So I thought I would take a small break from my canvas stretching series to share the story.

I have been painting and sculpting for many years (too many to tell;-). I always wanted to learn to stretch canvas, but was lazy and needed to see someone do it first. You see, I am a visual person (hence the artist) and once I see something done, it's much easier to be able to do it. Last year I decided to get back to my joy and paint and sculpt full time. I always wanted to go really large, but just hadn't done it yet. Originally, I had a friend that I was going to paint a piece for (kind of a 'thank you' piece) and he wanted it very big. So that was my excuse to go BIG! I went to the store to pick up a canvas and was shocked at the price of stretched canvas. Yicks! It was around $120. Luckily there was a 50% off sale. Now I was looking at $60. I started looking around and a local art supply store is always running a 50% off sale. Theirs canvas was $65. Since I wasn't paying for this one, no biggie, but the next one would be a biggie. I went ahead and bought the canvas and realized if I wanted to do big pieces, I needed to learn how to stretch my own.

I was hanging out with an artist friend, Jesse Cole, who stretched his own. The universe always help ya out when you need it, I find. I asked if he would teach me, and with a few improvements, WALA here we are! I find it very cathartic and now always have around 10 blank canvases to paint on. I love it and each canvas costs me less than $10, even the big ones. How cool is that? My hope is that you will enjoy stretching your own as much as I do. I find that my art is richer now than when I just went to the store, picked up the cheapest canvas I could find, and plunked my money down for it. Here's to the process, Enjoy!!

Like this and want to read more,

Subscribe to Galleria Lisa News

Tuesday, October 14, 2008

Picking Out the Perfect Wood...for your canvas!

As I continue with the "How to Stretch a Canvas Series", Phase 1 is one of the most important stages of the precess. I have broken it down into 4 Simple Steps to Picking Out the Wood. These steps are all you will need for stretching your first canvas and hopefully many more after.


Phase 1: Getting the right materials
Tools Needed: Pen and paper, tape measure, wood, various nails & staples, red marker

Picking out your Wood!


The first step to stretching your on canvases is deciding where you are going to buy your wood as well as the type and size of wood you are going to use.


1) First I decide how many frames I am going to make, get the measurements of each piece. EXAMPLE: If I am making a 2 foot by 2 foot canvas, I will need 4 pieces and 1 brace. I will need 2 pieces that measure 24inches and 2 pieces that measure 21inches (remember the wood is 1.5inches and 21+ 1.5+1.5=24). The brace needs to be 21inches as well. TIP Keep in mind that most of the pieces of wood you are going to buy are 96inches long, so plan each piece of wood to get the most out of it!

2) I have found that Home Depot has a great selection of 2x2s. (That is what I use.) Keep in mind that the 2x2 is really 1.5x1.5 and usually 96 inches long and all other sizes with not measure to what they say. Always measure your wood to be sure. Depending on your style and the size of the piece will determine the wood you use. I have found for all intense and purposes the 2x2s look the best after it is stretched and painted. It is thick for a gallery wrap, but not too wide or heavy. Choose what works best for you!

3) Once you pick the type of wood and size you plan to use, then you need to pick the straightest and most blemish free pieces you can find. If they are warped your canvas will suffer. I have spent as much as 3 hours picking out my wood. Once I find what I think is a fairly straight piece, I will eyeball it (put 1 end on the ground and your eye up to the other and look down it to check for bends, warped areas, and knots in the wood). I then, put in on the ground and roll it on the floor to see how it rolls from side to side. Check for rises in the piece or it not lying solid. Take your marker and tape measure and mark the wood where it will be cut. Remember if it is not as straight as possible it won’t hang correctly on the wall!


4) Always look at each piece after it is cut and make sure it is the correct measurement you asked for. TIP If you have the employee cut 2 pieces at the same time, then they will match. You want to get as close as possible to the original dimensions. Don’t be afraid to have the employee fix the piece or correct the mistake if it happens, but don’t be too precise. They do the best they can and a little smile and a “thank you so much” go a long way!


Once you have chosen the wood and had it cut, you are ready for the next step. Choosing your nails will follow. Stayed tuned.............


Until then, Enjoy the process!


Want to read more like this

Subscribe to Galleria Lisa News

Tuesday, October 7, 2008

16 Tools You Need to Stretch Your Own Canvas!

Have you ever wondered "How To Stretch Your Own Canvas" ? Well I'm gonna tell ya in the coming weeks! It starts with the right tools and supplies. Take a little time, go to a couple of local art supply stores in your area and do some research online. Check out Blick Art Materials online, they are great for comparison shopping and getting info that you need, as well as a great selection of art supplies, descriptions, and great pricing. I use them a lot. Once you've done some research on the perfect tools for you, start getting the tools together. My recommendation is to get good quality tools and supplies, as you will be using them for the rest of your art career. The quality of your tools will reflect in the quality of your stretched canvases and the quality of your art itself.

All the tools needed to stretch your own canvas: Wood (see Phase 1-Wood), Various Nails (see Phase 1-Nails/Staples), Staple Gun, Staples (see Phase 1-Nails/Staples), Canvas Stretching Pliers, Hammer, Tape Measure, Wood Glue, Canvas (see Phase 1-Canvas), Razor Blade, Scissors, Red Marker, Sand Paper, Flat-Head Screw-Driver, pen and paper.

As I continue this "How To Stretch Your Own Canvas" series, I will go through every step you will need to perfect this process. Stay posted in the weeks to come as I teach you step by step "How To Stretch Your Own Canvas". Enjoy the process!
If you wanna see more like this Subscribe in a reader